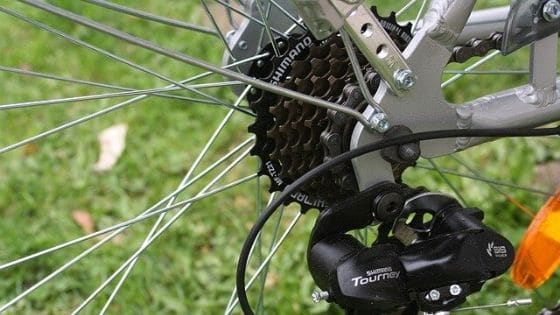
Mountain Bikes are specialized bikes that can run across tough terrains of highs and lows and for an off-road experience. Many mountaineers and hikers use mountain bikes to cycle through rough patches of land, especially while going down the hills. The road bikes are easy to paddle and are fast on pavement much contrary to mountain bikes, which means they are hard to paddle and slow on pavements.
If you are an in-city rider, then it is better if you go for a standard bike with faster tires. However, if you want a harder body workout, then definitely try mountain bikes on pavements. The tires will drag you slowly, making a 30-40 minute ride a complete workout package. With the levels of risk involved in riding mountain bikes in a rough hilly patch of land, learning how to adjust Shimano gears on a mountain bike becomes essential.
Table of Contents
What are Shimano Gears?
Shimano is a Japanese technology that uses ‘Shimano Total Integration’ levers. The shifters in Shimano use two levelers. The larger one in the front and the smaller ones at the back. Kabushiki-Kaisha Shimano is an international manufacturer of biking components, fishing and rowing equipment.
The shifter on the left controls the chainrings. Logically speaking, if you wish to go a little slower or have more control over your bike, you have to change into a larger chainring for more leisurely paddling. This part may be used when you are going down the hill. On the other hand, you can transform into a smaller chainring for faster and smoother paddling.
The shifter on the right allows you to make quick changes on the chainrings, giving you a variation of two choices in paddling. For more resistance on a flat surface, you have to push the smaller lever. Whereas, when you wish to wish to peddle faster or easier, you simply press the larger lever.
How to adjust Shimano gears on a mountain bike?
For starters, there are primarily four to five levels involved in adjusting the gears of your beloved mountain bike.
Here’s how to adjust Shimano gears on a mountain bike with brief descriptions below –
Upper Limit Adjustment
The first thing we need to do is to adjust the derailleur into a small cog. After we are done with that, we will have to adjust the barrel adjuster in such a way that we are left with enough room to fix it after we are done adjusting the cable tension.
Adjusting the high/upper limit screw is the starting point. We need to change the screw in such a manner to put the upper pulley right beneath the small cog and turn the screw to outboard it.
Then we need to loosen the cable anchor and tightly pull the cable and, thereafter tighten the anchor back down.
We will have to adjust the index. Once you start shifting the derailleur, you will realise that the shifters are not moving smoothly. We will have to change the barrel to gently maneuver the index. Keep rolling the cassette and find out the sweet spot.
A good starting point is to dig the fifth cog and line up the derailleur beneath that cog (visually). Then adjust the barrel to find out where the pulley lines up beneath the fifth cog. Make sure to line up the cog inboard and roll the cassette after tightening the screw once again to see how it goes.
This is the point to check whether the chainring is shifting gears properly or not. Once you roll the chainring, you will see a smooth functioning cassette.
Lower Limit Adjustment
Now it’s time to adjust the lower limit. We will have to shift the derailleur into the largest sprocket wheel or the cog, so to say. Line up the derailleur underneath the largest sprocket and start turning the lower limit screw until you find some resistance.
Keep in mind that you would not want to adjust the system over at all. We need to make sure that the derailleur does not shift into the spokes. So, ideally, just keep rolling the cassette and keep checking the smoothness with which the gears are shifting to and fro.
Listen closely for clicking sounds. If the cassette makes clicking sounds, it merely means that you have to adjust the chainring placement on the cog trying to shift back down to the gear below. It is needless to mention that if the chain ever starts picking on the spokes, stop cycling then and there. Pull out the chain and get adjusting immediately.
The Cable Tension Adjustment
One of the most important aspects of a tension cable is to avoid tightening it too hard and avoid keeping it too loose. If you tighten it too hard, it’s going to break. If you loosen it too much, you might have to adjust your cassette once you’re on the road. However, this is a part that is included in the upper and lower limit adjustments.
Barrel Adjustment
Barrel adjusters are typically located near the brake levers, brake calipers, gear levers, and derailleurs. Barrel adjusters are necessary for fine-tuning your caliper engagement and shift indexing. However, the relevant parts constituting the adjustments of Shimano gears are included in the upper and lower limit adjustments.
B-Tension Adjustment
This is the final step, where we need to adjust the B-Tension screw. The B-Tension screw is known to adjust the angle of the derailleur to the rolling cassette. If we modify the screw clockwise, it’s going to pull the derailleur down.
On the other hand, if we screw the B-tension screw anti-clockwise, it’s going to push the derailleur upwards. In case you have a larger sprocket wheel or a cassette, you might want to pull the derailleur down.
We will have to target for having the B-Tension screw as close as possible to the derailleur without the derailleur touching the cog or the sprocket wheel. It is essential to have this screw closer will ensure quicker gear shifts as well as provide durability to the chain and the cassette.
Conclusion
So now you know how to adjust Shimano gears on a mountain bike at your home, friendly and comfortable. This adjustment procedure is the love of all bike lovers across the world and even makes your mountain bike faster. For better pleasures of riding a mechanical bike is to keep fine-tuning your ride for a more lovable experience on and off the road. However, if you are in any doubt, consult an expert.

